“This comprehensive guide focuses on optimizing WordPress blogs for global audiences. It’s specifically designed for WordPress site administrators who manage blogs with international readership and are interested in integrating Oracle Cloud Infrastructure (OCI) with Cloudflare for optimal performance.”
Table of Contents
ToggleUnderstanding the Global Performance Challenge
For blogs serving a global audience, speed is absolutely crucial. While Oracle Cloud Infrastructure (OCI) delivers exceptional performance and reliability, the inherent limitation of serving content from a single data center location can result in increased loading times for users in geographically distant locations. To overcome this global service limitation, we’ll explore how to optimize your WordPress blog using Cloudflare’s CDN services.
My Infrastructure Configuration
For this optimization guide, I’ve implemented the following setup:
- Created an Oracle Cloud (OCI) account in the Korea region utilizing free-tier resources
- Purchased a domain through name.com (for example, datainhands.com)
- Connected the domain to a WordPress instance
- Completed basic WordPress configuration
What is Cloudflare?
Cloudflare is a global network service operating in more than 275 cities worldwide. Through its CDN service, website content is cached and served from servers positioned strategically around the globe. This distributed approach significantly improves loading speeds for all visitors. Additionally, Cloudflare provides comprehensive security features including DDoS protection, SSL certificates, and web application firewall capabilities.
Key Benefits of Cloudflare Implementation
When implementing Cloudflare, you can expect these significant advantages:
Global Performance Enhancement
- Content delivery through CDN servers in 275+ cities worldwide
- Cached content served from geographically optimal locations
- Dramatic reduction in page loading times
- Smart routing optimization
Security Strengthening
- Free SSL/TLS certificate provisioning
- Robust DDoS protection features
- Web Application Firewall (WAF)
Optimization Features
- Automatic file minification capabilities
- Comprehensive image optimization
- Network routing optimization
- Smart caching strategies
Implementation Guide
1. Cloudflare Account Setup
Begin by creating your Cloudflare account:
- Navigate to cloudflare.com
- Click the “Sign Up” button in the top right corner
- Enter your email address and create a password
- Complete the email verification process
2. Domain Registration Process
Follow these detailed steps to register your domain with Cloudflare:
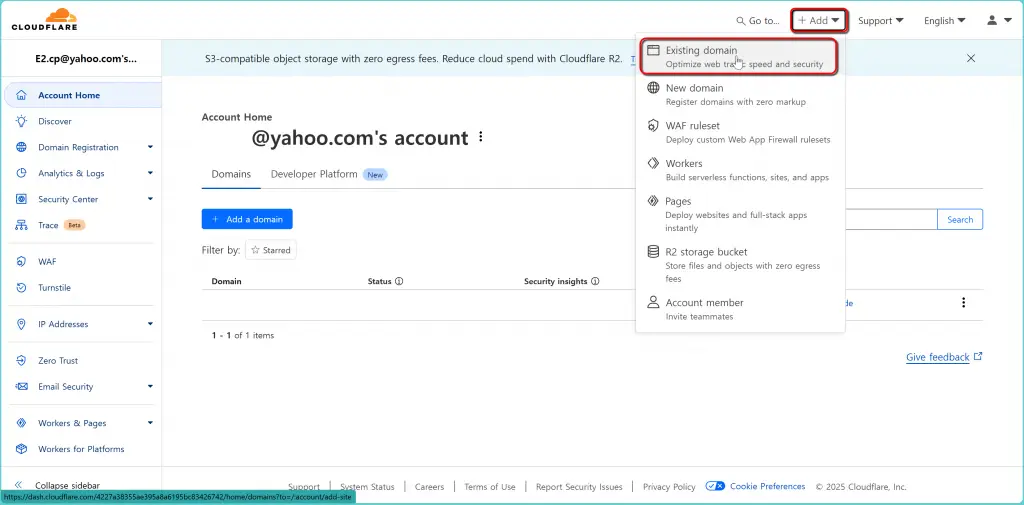
- In the Cloudflare dashboard, locate and click “Add Site”
- Enter your domain name purchased from name.com
- For personal blogs, select the Free Plan which provides sufficient functionality
- Review the available features and confirm your selection
3. DNS Configuration Migration
This critical step requires careful attention to detail:
Reviewing Existing DNS Records
Cloudflare automatically scans your current DNS records. The crucial element here is ensuring your OCI instance’s IP address is correctly configured in the A record. This is the perfect time to verify and correct any DNS configuration issues.
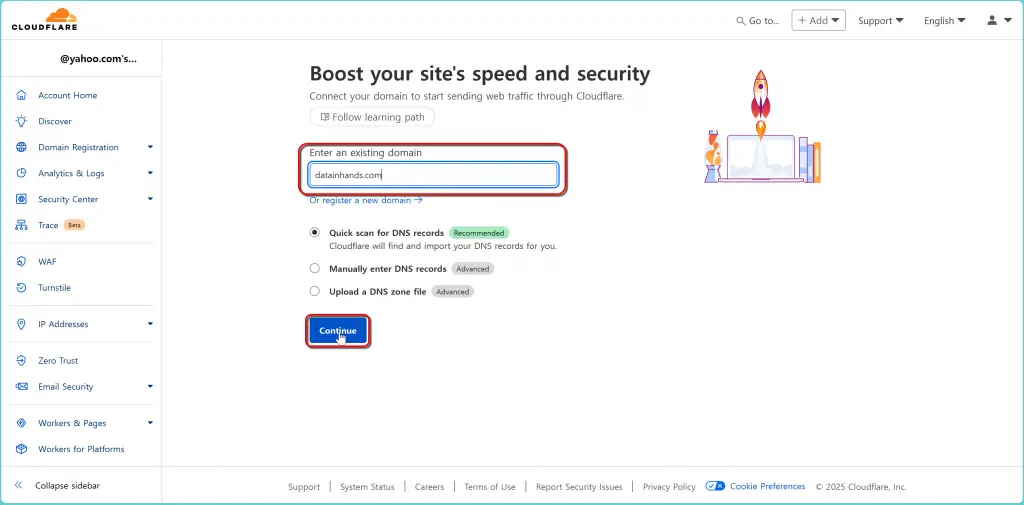
- Carefully review the automatically scanned DNS records
- Verify the OCI instance’s A record accuracy
- Click “Continue to activation” after confirmation
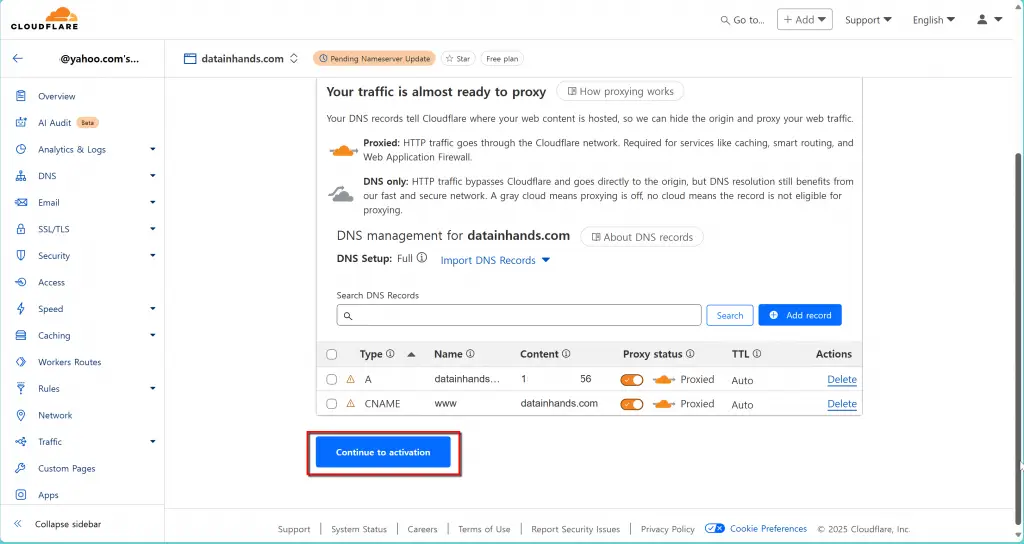
4. Nameserver Update Process
This vital step requires updating your nameservers at name.com:
1. Copy the Cloudflare-provided nameserver addresses (typically two are provided)
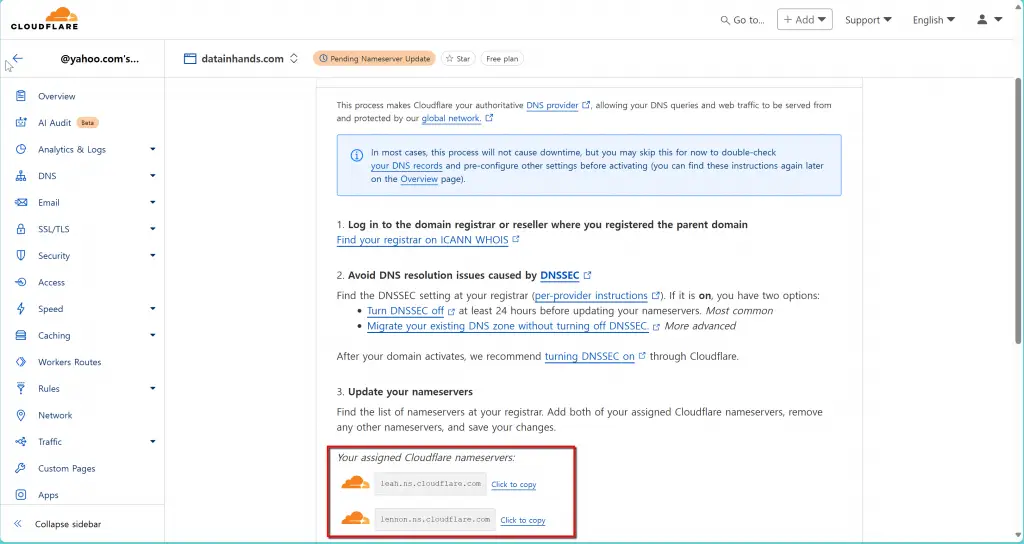
2. Access your name.com dashboard
4. Locate the nameserver configuration area
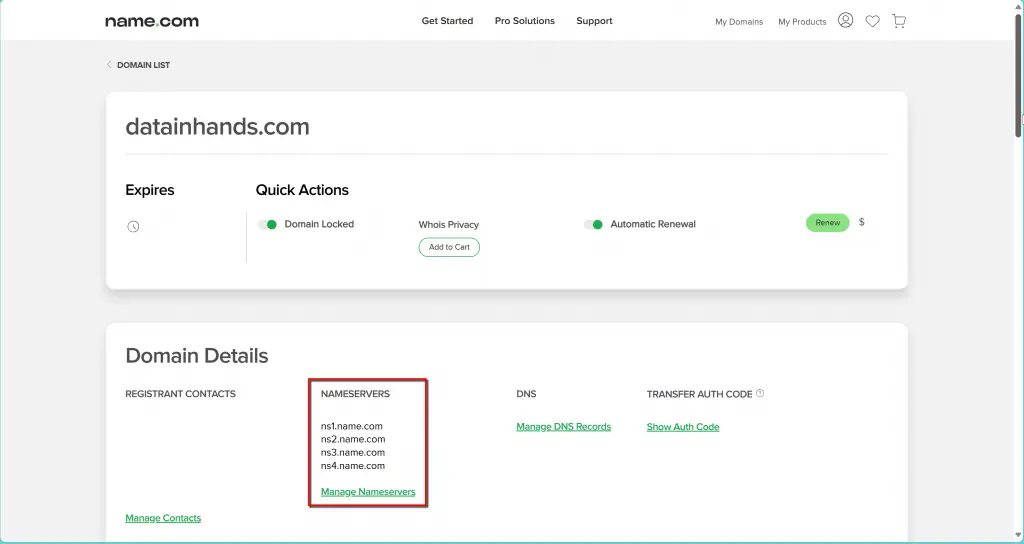
6. Input the Cloudflare nameservers
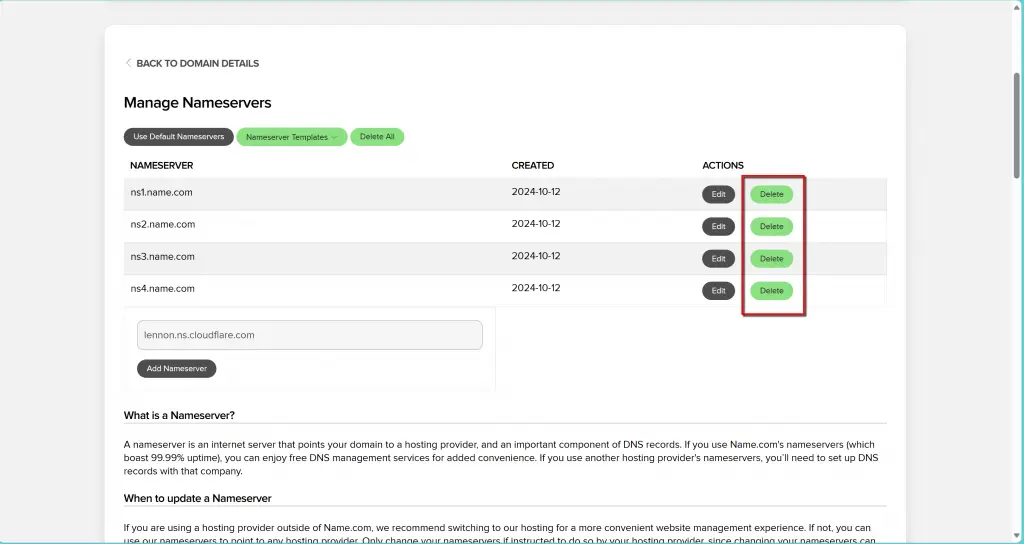
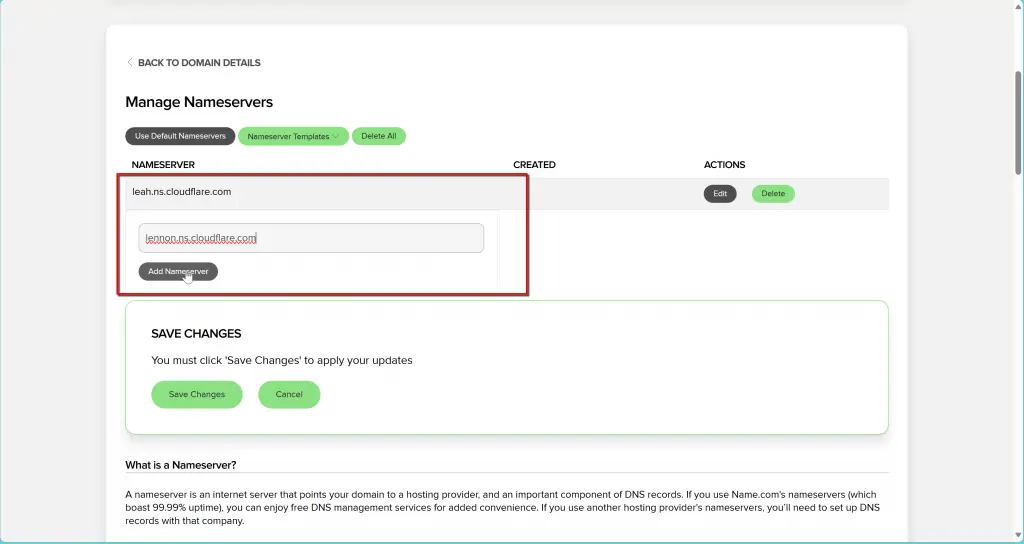
7. Save your changes
While the system indicates up to 24 hours for propagation, you’ll typically receive a completion email within 5-10 minutes.
5. SSL/TLS Security Configuration
Navigate to the SSL/TLS section in your Cloudflare dashboard for security setup:
Certificate Mode Configuration
- Access the SSL/TLS tab
- Navigate to the Overview section
- Select SSL/TLS encryption configuration
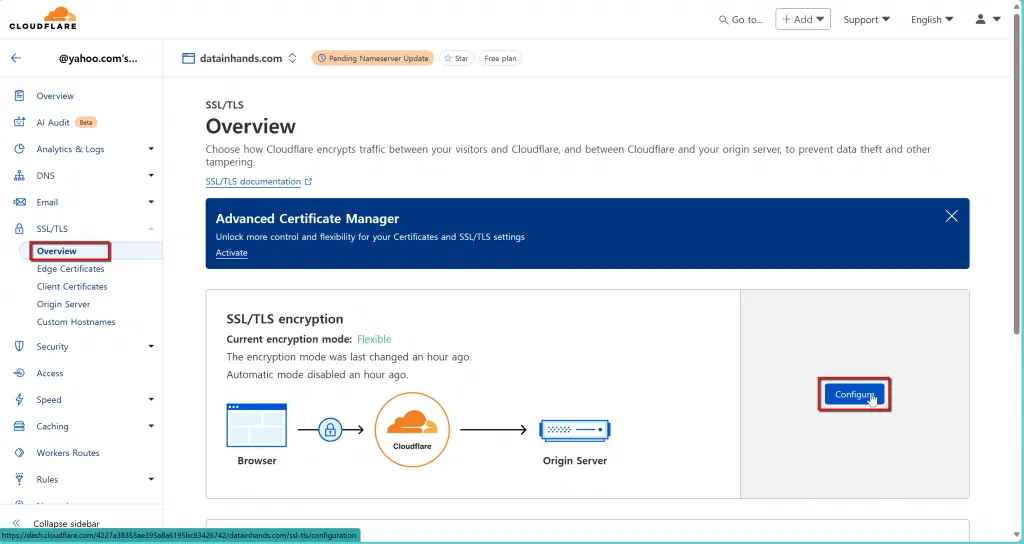
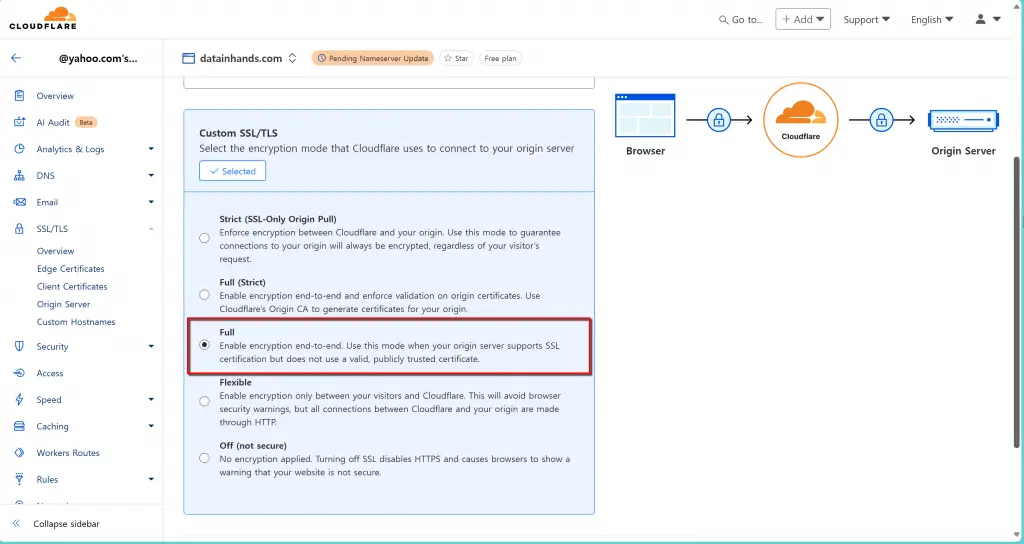
Custom SSL/TLS Option
For WordPress blogs hosted on OCI, the “Full” SSL mode is recommended because:
- Cloud instances typically use self-signed SSL certificates
- Full mode ensures encryption between:
- Global users and Cloudflare
- Cloudflare and your cloud server
Edge Certificate Setup
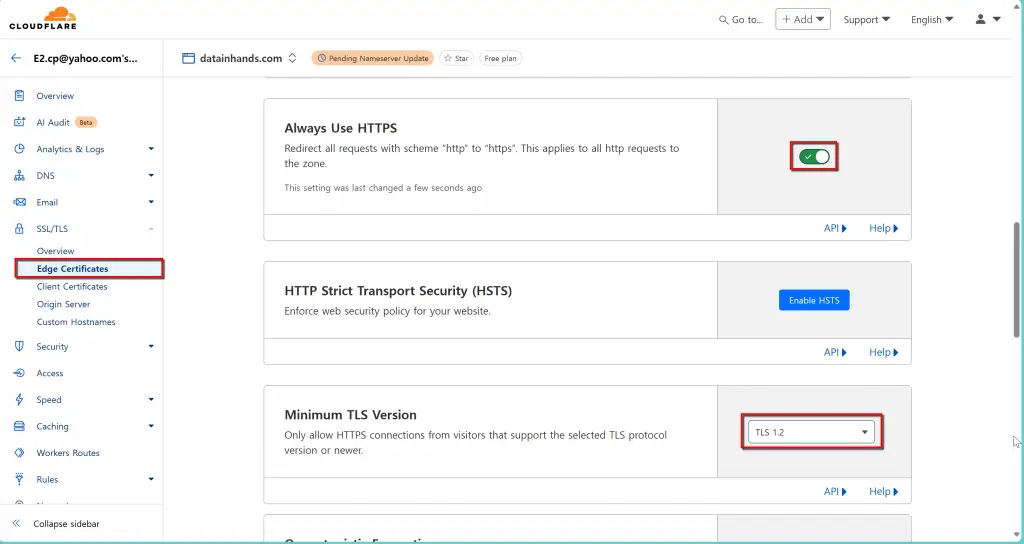
- Navigate to Edge Certificates section
- Enable “Always Use HTTPS”
- Set Minimum TLS Version to 1.2
- Configure additional security options as needed
6. Cache Optimization Settings
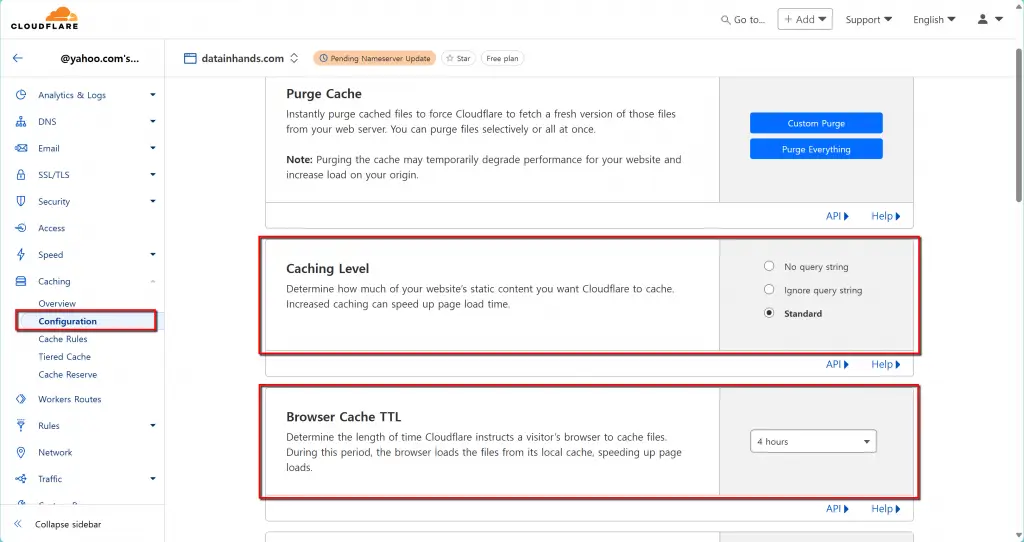
Cache configuration is crucial for performance enhancement. The primary settings are managed in the “Caching” section of your Cloudflare dashboard.
Basic Cache Configuration
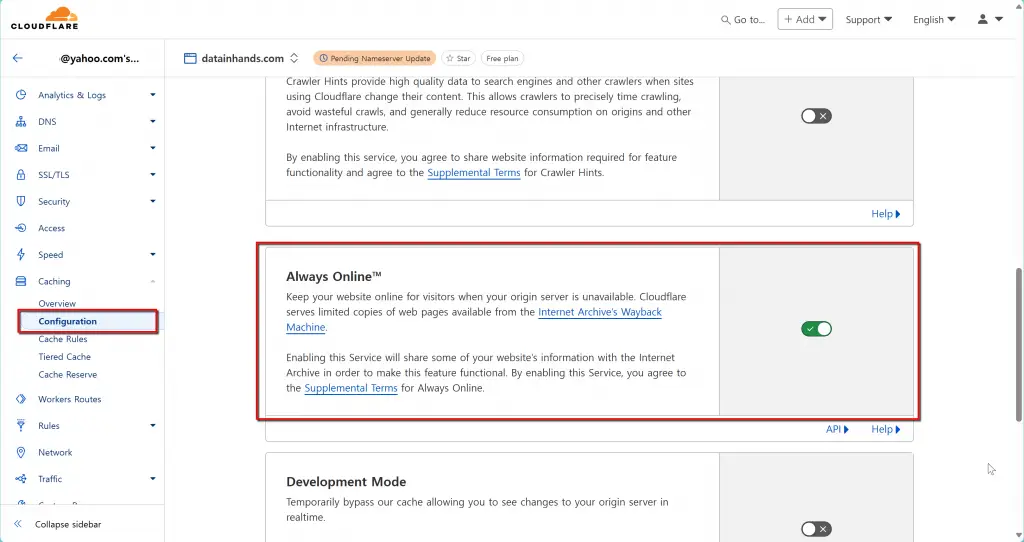
Navigate to the Caching tab and apply these recommended settings:
- Browser Cache TTL: 4 hours
- Always Online: Enabled
- Cache Level: Standard
Page Rules Configuration
Create specific caching rules:
- Access the Page Rules tab
- Click Create Page Rule
- For WordPress admin pages:
- URL pattern: wp-admin
- Setting: Cache Level: Bypass
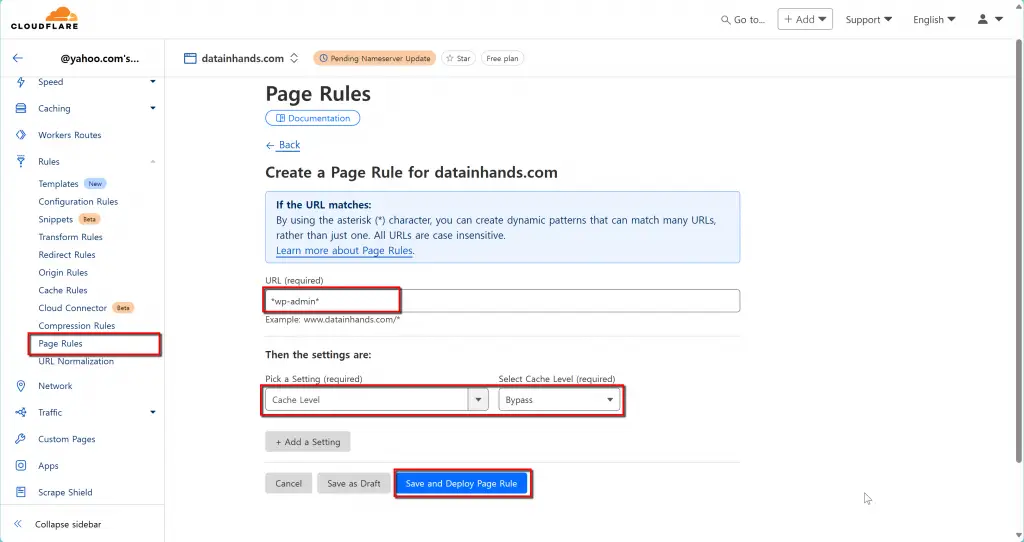
After completing these configurations, Cloudflare automatically distributes your content across global data centers. Visitors receive content from their nearest data center, ensuring optimal loading speeds.
To verify proper cache operation, examine response headers in your browser’s developer tools. A cf-cache-status header showing “HIT” indicates successful caching.
7. WordPress Optimization Configuration
Performance Optimization
Cloudflare offers WordPress-specific optimization options:
- Navigate to Speed → Optimization
- Enable these settings:
- Automatic JavaScript minification
- CSS minification
- HTML minification
- Brotli compression
- Rocket Loader for JavaScript optimization
Image Optimization Settings
In the Images section, configure:
- Polish: Enable (Lossless)
- Lazy Loading: Enable
8. Monitoring and Analytics Setup
Analytics Tool Configuration
- Access the Analytics tab
- Enable Web Analytics
- Insert the provided JavaScript snippet into your WordPress theme’s header.php
Performance Monitoring Setup
- Navigate to Speed → Analytics
- Monitor page load times
- Track cache hit rates
9. Troubleshooting and Maintenance
Cache Management
After content updates, clear cache:
- Go to Caching → Configuration
- Click Purge Everything
SSL Issue Resolution
For mixed content warnings:
- Update site URL to HTTPS in WordPress admin
- Perform database URL bulk updates if needed
Configuration Verification
After implementation, verify:
- SSL functionality:
- Check browser security indicator
- Run SSL Labs test
- Page load performance:
- Conduct Google PageSpeed Insights analysis
- Perform GTmetrix performance testing
- Cache behavior:
- Check cache response headers
- Monitor Cloudflare cache hit rates
Expected Performance Improvements
Following complete implementation, expect:
- Global page loading time reduction of 50-70%
- Significant server load reduction
- Enhanced security posture
- Improved overall availability
- Better user experience worldwide
Conclusion
By following this detailed guide, you’ll establish a WordPress blog capable of delivering outstanding performance to global readers. The synergy between OCI’s robust infrastructure and Cloudflare’s global CDN network ensures optimal content delivery to every visitor, regardless of their geographic location.
Need assistance with implementation? Feel free to leave a comment below, and I’ll be happy to help with your specific configuration needs.
Related: Advanced WordPress Security Configuration Guide | WordPress Performance Optimization | OCI Compute Instance Best Practices | Cloudflare Cache/CDN
This guide is based on WordPress 6.4+ and Oracle Cloud Infrastructure’s latest features as of January 2025. For the most current information, please refer to official documentation.

